> For the complete documentation index, see [llms.txt](https://yuelan-icus-organization.gitbook.io/zhi-sheng-ji/llms.txt). Markdown versions of documentation pages are available by appending `.md` to page URLs; this page is available as [Markdown](https://yuelan-icus-organization.gitbook.io/zhi-sheng-ji/shou-ci-she-zhi/zai-mei-you-xian-you-ardupilot-gu-jian-de-qing-kuang-xia-jiang-gu-jian-jia-zai-dao-ban-shang.md).
# 在没有现有 ArduPilot 固件的情况下将固件加载到板上
最新版本的ArduPilot(Copter-3.6,Plane-3.9,Rover-3.5)使用ChibiOS操作系统在相对较小的非Pixhawk自动驾驶仪上运行。 这些板的例子包括[OpenPilot RevoMini](https://ardupilot.org/copter/docs/common-openpilot-revo-mini.html#common-openpilot-revo-mini),[Mateksys F405-Wing](https://ardupilot.org/copter/docs/common-matekf405-wing.html#common-matekf405-wing)和[Omnibus F4 Pro](https://ardupilot.org/copter/docs/common-omnibusf4pro.html#common-omnibusf4pro)。
大多数情况下,这些板子预装了另一个自动驾驶仪软件。(如果主板已安装 ArduPilot,请参阅加载固件以获取[固件加载](https://ardupilot.org/copter/docs/common-loading-firmware-onto-pixhawk.html#common-loading-firmware-onto-pixhawk)说明。
将ArduPilot安装到这些自动驾驶仪涉及:
* 安装所需的驱动程序和刷机工具
* 下载相应的 ArduPilot 固件
* 将 ArduPilot 加载到开发板
注意
ArduPilot使用ChibiOS到Pixhawk自动驾驶仪的说明可以[在这里](https://ardupilot.org/copter/docs/common-loading-chibios-firmware-onto-pixhawk.html#common-loading-chibios-firmware-onto-pixhawk)找到。
### 下载驱动程序和刷机工具[¶](https://ardupilot.org/copter/docs/common-loading-firmware-onto-chibios-only-boards.html#download-driver-and-flashing-tool)
[STM32CubeProgrammer](https://www.st.com/en/development-tools/stm32cubeprog.html)将安装所需的DFU(直接固件上传)驱动程序,并可用于在DFU模式下将固件刷新为自动驾驶仪。这适用于Windows,Linux和MacOS系统。下载并安装此程序。您可能还需要安装 [JAVA](https://java.com/en/download/) 才能设置此程序。
### 下载 ArduPilot 固件[¶](https://ardupilot.org/copter/docs/common-loading-firmware-onto-chibios-only-boards.html#download-the-ardupilot-firmware)
* 从 [firmware.ardupilot.org](https://firmware.ardupilot.org/) 下载适用于您的主板的 ArduPilot 固件。通常,您可以通过执行以下操作找到合适的固件:
* 打开 [firmware.ardupilot.org](https://firmware.ardupilot.org/)
* 选择单击您的车辆类型的链接(即[飞机](https://firmware.ardupilot.org/Plane/)、[直升机](https://firmware.ardupilot.org/Copter/)、[漫游车](https://firmware.ardupilot.org/Rover/)、[潜艇](https://firmware.ardupilot.org/Sub/)或[天线跟踪器](https://firmware.ardupilot.org/AntennaTracker/))
* 选择“测试版”或“稳定版”
* 查找名称与自动驾驶仪最匹配的目录
* 单击下载“arduXXX\_with\_bl.hex”文件。它通常会保存在您的“下载”文件夹中。
### 使用测试版和开发人员版本[¶](https://ardupilot.org/copter/docs/common-loading-firmware-onto-chibios-only-boards.html#using-beta-and-developer-versions)
#### 试用版[¶](https://ardupilot.org/copter/docs/common-loading-firmware-onto-chibios-only-boards.html#beta)
在发布之前,将发布一个或多个版本。如果您想尝试较新的功能或帮助开发人员进一步对代码进行飞行测试,则可以使用这些。由于它们是“测试版”,因此可能仍然存在错误(尽管即使在稳定固件中也可以这样做)。但是,它已经过开发团队的测试,并且已经过飞行测试。此版本允许更广泛的用户群在固件发布之前对其进行最终测试。我们鼓励有经验的ArduPilot用户试飞此固件并提供反馈。`StableBetaStable`
#### 最新开发者版本[¶](https://ardupilot.org/copter/docs/common-loading-firmware-onto-chibios-only-boards.html#latest-developer-version)
这反映了 ArduPilot 代码开发分支的当前状态。它已经过开发团队的审查,通过了所有自动化测试套件,并且在大多数情况下,如果进行了重大更改,则会进行测试飞行。此代码每天构建,可供有经验的用户测试。这对应于“alpha”版本,并且可能存在错误,尽管很少“导致崩溃”。在添加更改或引入功能的添加后不久,Wiki 的[“即将使用](https://ardupilot.org/copter/docs/common-master-features.html#common-master-features)的功能”部分会更新有关添加或更改的信息。
### 将固件上传到自动驾驶仪[¶](https://ardupilot.org/copter/docs/common-loading-firmware-onto-chibios-only-boards.html#upload-the-firmware-to-autopilot)
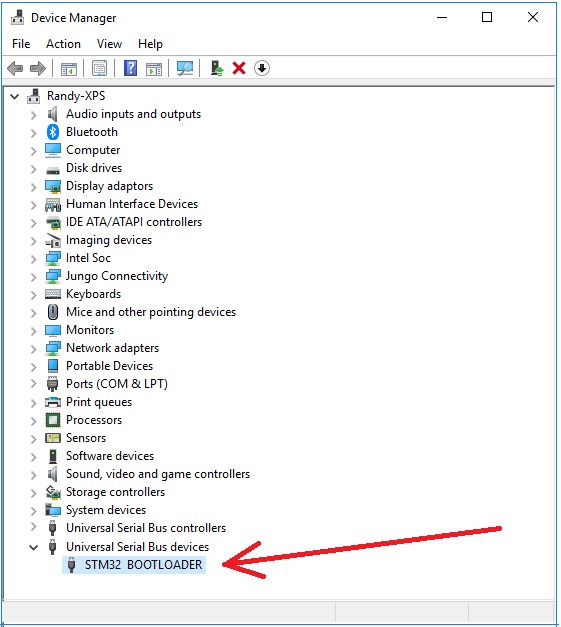
* 按住主板的 DFU 按钮或暂时桥接其“BOOT”引脚,然后插入 USB 电缆(连接到您的 PC)。通电后释放按钮或取消桥接。
* 打开Windows设备管理器,在“通用串行总线设备”下查找“STM32引导加载程序”,以确认主板处于DFU模式。
 * Start the STM32CubeProgrammer
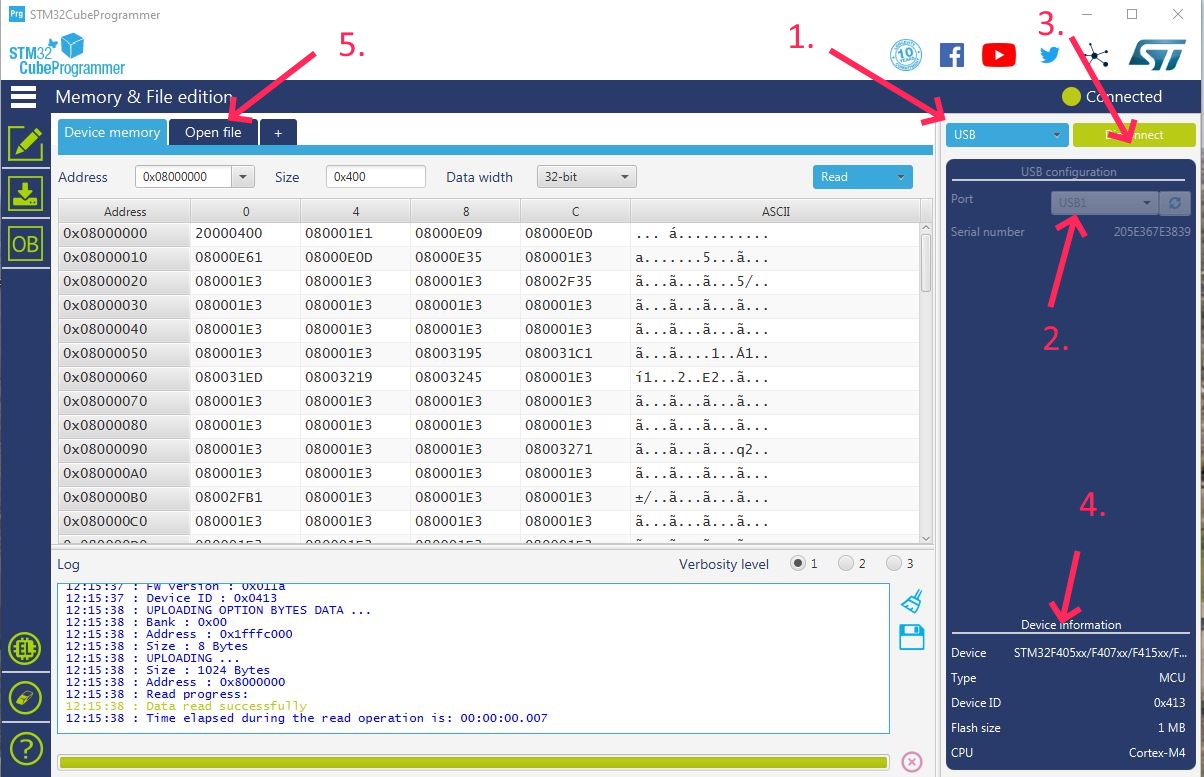 1. 选择连接方式:USB
2. 确保 USB 端口显示...这意味着在DFU模式下检测到电路板。
3. 按“连接”
4. 然后主板 CPU 细节将显示在此处。
5. 按“打开文件”以选择您下载的“arduXXX\_with\_bl.hex”文件。
6. 文件名将显示在选项卡中。
1. 选择连接方式:USB
2. 确保 USB 端口显示...这意味着在DFU模式下检测到电路板。
3. 按“连接”
4. 然后主板 CPU 细节将显示在此处。
5. 按“打开文件”以选择您下载的“arduXXX\_with\_bl.hex”文件。
6. 文件名将显示在选项卡中。
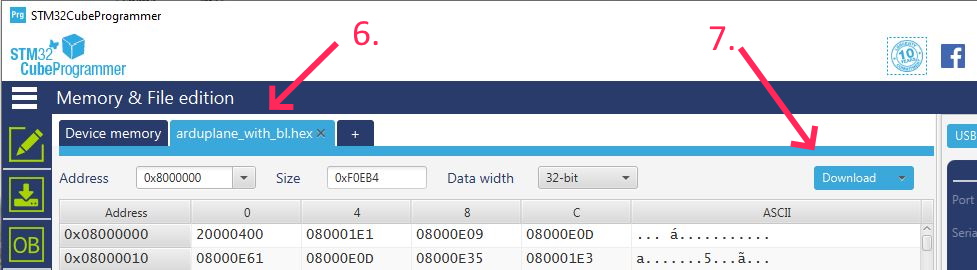 7. 按“下载”将文件烧录到开发板上。
您现在可以重新启动开发板并[连接您喜欢的地面站](https://ardupilot.org/copter/docs/common-connect-mission-planner-autopilot.html#common-connect-mission-planner-autopilot)(任务规划器、QGC 等),并且将来也可以使用 Pixhawk 板的常规方法上传固件。
### 替代方法[¶](https://ardupilot.org/copter/docs/common-loading-firmware-onto-chibios-only-boards.html#alternate-method)
#### 下载并安装 Zadig(仅限 Windows)[¶](https://ardupilot.org/copter/docs/common-loading-firmware-onto-chibios-only-boards.html#download-and-install-zadig-windows-only)
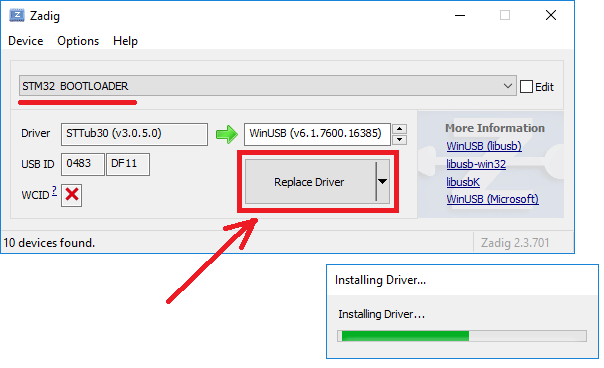
* 下载并运行Zadig(在“下载”下方搜索“[Zadig](https://zadig.akeo.ie/) 2.3”),以允许使用USB访问开发板。
* 从选项菜单中选择“列出所有设备”选项
* 从下拉列表中选择“STM32引导加载程序”,然后按“替换驱动程序”按钮
7. 按“下载”将文件烧录到开发板上。
您现在可以重新启动开发板并[连接您喜欢的地面站](https://ardupilot.org/copter/docs/common-connect-mission-planner-autopilot.html#common-connect-mission-planner-autopilot)(任务规划器、QGC 等),并且将来也可以使用 Pixhawk 板的常规方法上传固件。
### 替代方法[¶](https://ardupilot.org/copter/docs/common-loading-firmware-onto-chibios-only-boards.html#alternate-method)
#### 下载并安装 Zadig(仅限 Windows)[¶](https://ardupilot.org/copter/docs/common-loading-firmware-onto-chibios-only-boards.html#download-and-install-zadig-windows-only)
* 下载并运行Zadig(在“下载”下方搜索“[Zadig](https://zadig.akeo.ie/) 2.3”),以允许使用USB访问开发板。
* 从选项菜单中选择“列出所有设备”选项
* 从下拉列表中选择“STM32引导加载程序”,然后按“替换驱动程序”按钮
 * 或者,您可能希望检查开发板是否显示为 USB 端口:
* 按住主板的 DFU 按钮并插入 USB 电缆(连接到您的 PC)
* 打开Windows设备管理器,在“通用串行总线设备”下查找“STM32引导加载程序”,以确认主板处于DFU模式。
#### 下载 ArduPilot 固件[¶](https://ardupilot.org/copter/docs/common-loading-firmware-onto-chibios-only-boards.html#id1)
* 从 [firmware.ardupilot.org](https://firmware.ardupilot.org/) 下载适用于您的主板的 ArduPilot 固件。通常,您可以通过执行以下操作找到合适的固件:
* 打开 [firmware.ardupilot.org](https://firmware.ardupilot.org/)
* 选择单击您的车辆类型的链接(即[飞机](https://firmware.ardupilot.org/Plane/)、[直升机](https://firmware.ardupilot.org/Copter/)、[漫游车](https://firmware.ardupilot.org/Rover/)、[潜艇](https://firmware.ardupilot.org/Sub/)或[天线跟踪器](https://firmware.ardupilot.org/AntennaTracker/))
* 选择“测试版”或“稳定版”
* 查找名称与自动驾驶仪最匹配的目录
* 单击下载“arduXXX\_with\_bl.hex”文件。它通常会保存在您的“下载”文件夹中。
#### 将 ArduPilot 上传到开发板[¶](https://ardupilot.org/copter/docs/common-loading-firmware-onto-chibios-only-boards.html#upload-ardupilot-to-the-board)
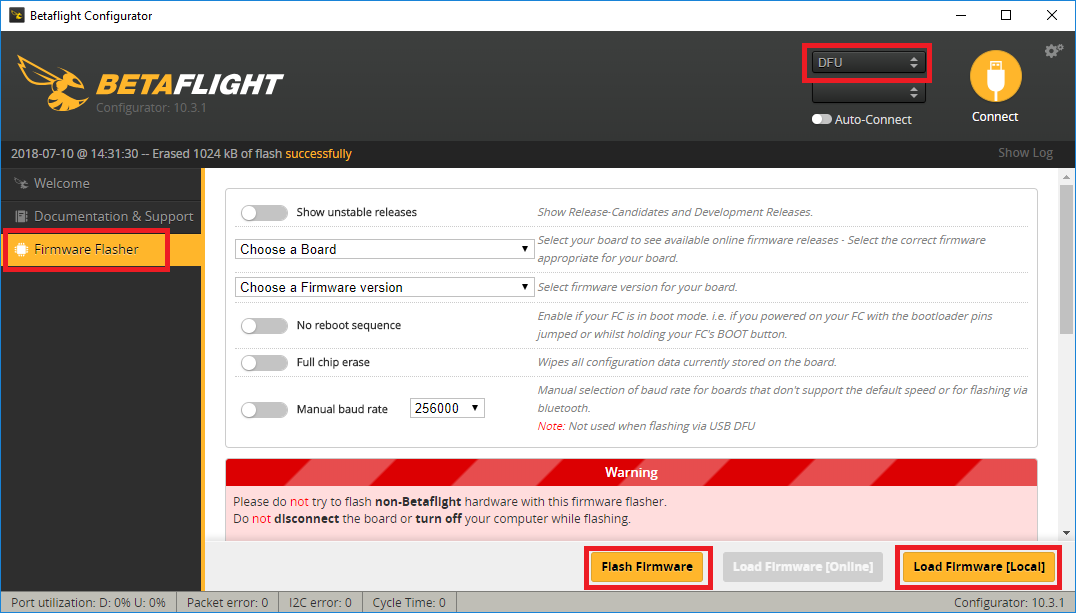
* 下载、安装并运行 [Betaflight 配置器](https://github.com/betaflight/betaflight-configurator/releases)。
* 选择屏幕左侧的“固件刷新器”
* 从右上角选择 DFU
* 按右下角的“加载固件\[本地]”,然后选择您在上面下载的arduXXX\_with\_bl.hex文件。
* 按“闪存固件”,几分钟后应加载固件
* 或者,您可能希望检查开发板是否显示为 USB 端口:
* 按住主板的 DFU 按钮并插入 USB 电缆(连接到您的 PC)
* 打开Windows设备管理器,在“通用串行总线设备”下查找“STM32引导加载程序”,以确认主板处于DFU模式。
#### 下载 ArduPilot 固件[¶](https://ardupilot.org/copter/docs/common-loading-firmware-onto-chibios-only-boards.html#id1)
* 从 [firmware.ardupilot.org](https://firmware.ardupilot.org/) 下载适用于您的主板的 ArduPilot 固件。通常,您可以通过执行以下操作找到合适的固件:
* 打开 [firmware.ardupilot.org](https://firmware.ardupilot.org/)
* 选择单击您的车辆类型的链接(即[飞机](https://firmware.ardupilot.org/Plane/)、[直升机](https://firmware.ardupilot.org/Copter/)、[漫游车](https://firmware.ardupilot.org/Rover/)、[潜艇](https://firmware.ardupilot.org/Sub/)或[天线跟踪器](https://firmware.ardupilot.org/AntennaTracker/))
* 选择“测试版”或“稳定版”
* 查找名称与自动驾驶仪最匹配的目录
* 单击下载“arduXXX\_with\_bl.hex”文件。它通常会保存在您的“下载”文件夹中。
#### 将 ArduPilot 上传到开发板[¶](https://ardupilot.org/copter/docs/common-loading-firmware-onto-chibios-only-boards.html#upload-ardupilot-to-the-board)
* 下载、安装并运行 [Betaflight 配置器](https://github.com/betaflight/betaflight-configurator/releases)。
* 选择屏幕左侧的“固件刷新器”
* 从右上角选择 DFU
* 按右下角的“加载固件\[本地]”,然后选择您在上面下载的arduXXX\_with\_bl.hex文件。
* 按“闪存固件”,几分钟后应加载固件
 您现在可以重新启动开发板并[连接您喜欢的地面站](https://ardupilot.org/copter/docs/common-connect-mission-planner-autopilot.html#common-connect-mission-planner-autopilot)(任务规划器、QGC 等),并且将来也可以使用 Pixhawk 板的常规方法上传固件。
### 使用外部闪存将固件加载到主板上[¶](https://ardupilot.org/copter/docs/common-loading-firmware-onto-chibios-only-boards.html#loading-firmware-onto-boards-with-external-flash)
最近的一些主板,最着名的是来自Serious Pro Racing()的主板,使用具有少量内部闪存但具有更大外部连接的闪存芯片的MCU。这些板需要额外的步骤来加载ArduPilot固件。通常,某种引导加载程序驻留在内部闪存上,然后主固件驻留在外部闪存上。
#### 使用 SSBL 加载固件[¶](https://ardupilot.org/copter/docs/common-loading-firmware-onto-chibios-only-boards.html#loading-firmware-using-ssbl)
SPRacing 系列主板在内部闪存上预装了专有引导加载程序,需要使用第二级引导加载程序来加载更多固件。有几个选项可以使用这些板加载固件,但无论您选择哪个选项,您都需要首先使用 SSBL 加载 ArduPilot。请按照 中的“安装”说明进行操作,以便将SSBL加载到主板上。加载 SSBL 后,请按照 PX4 说明将 ArduPilot 加载到主板[上 https://github.com/spracing/ssbl#px4-installation-to-external-flash](https://github.com/spracing/ssbl#px4-installation-to-external-flash) 但请不要使用 PX4 固件,请使用 arducopter.bin 固件映像。步骤摘要如下:
* 下载 并将SSBL安装到外部闪存,
* 下载最新的ArduPilot外部闪存二进制文件,例如
* 使用 dd 将二进制文件填充到 2MB:
```
dd if=/dev/zero ibs=1k count=2048 of=AP_2MB.bin
dd conv=notrunc if=arducopter.bin of=AP_2MB.bin
```
* 将主板置于 SSBL dfu 模式 - 关闭电源,按住 BIND (非启动),打开电源 - LED 快速闪烁,释放绑定,LED 缓慢闪烁 - DFU 模式已启用
* 使用
```
dfu-util -D AP_2MB.bin -s 0x90100000:0x200000
```
* 验证闪光灯。下面的dfu-util命令将闪存的内容复制回计算机,diff命令会告诉您内容是相同还是不同。如果 diff 没有说文件相同,请不要尝试飞行 - 重试。
```
dfu-util -U AP_2MB-VERIFY.bin -s 0x90100000:0x200000
diff -sb AP_2MB.bin AP_2MB-VERIFY.bin
```
* 关闭电源,安装 SD 卡(.注意:*您必须*安装 SD 卡,没有它固件将无法启动),打开电源
* 使用任务规划器正常配置电路板
此时,您应该在板上具有工作固件。如果要加载新固件,则需要再次执行步骤 2-7(无法使用任务规划器加载固件)。如果您确定永远不想在板上加载betaflight,那么您可以安装ArduPilot引导加载程序。
#### 安装 ArduPilot 引导加载程序[¶](https://ardupilot.org/copter/docs/common-loading-firmware-onto-chibios-only-boards.html#installing-the-ardupilot-bootloader)
警告
安装 ArduPilot 引导加载程序是单向操作。在此步骤之后,您无法将主板恢复为出厂配置或加载 beta - 假设可以,您必须将主板返回到 Serious Pro 才能使用出厂固件重新刷新
**如果您确定只想在开发板上使用 ArduPilot,那么**刷新 ardupilot 引导加载程序可以实现更简单的后续升级。
* 您最初必须在主板上安装ArduPilot的工作版本 - 请按照上述步骤操作。
* 现在,您必须移除内部闪存上的复制保护。这是一项破坏性操作,需要完全擦除闪光灯。ArduPilot提供支持,使这变得容易。设置 [BRD\_OPTIONS](https://ardupilot.org/copter/docs/parameters.html#brd-options) = 16。
* 关闭电源并打开主板电源。主板似乎无法启动,但闪存扇区正在擦除。等待几秒钟,然后关闭开发板电源。
* 按住按钮(这次*不*绑定启动)并打开自动驾驶仪的电源。这将使电路板处于 dfu 模式。`boot`
* 下载 ArduPilot 引导加载程序,例如
* 通过 dfu 安装引导加载程序:
```
dfu-util -a 0 --dfuse-address 0x08000000 -D SPRacingH7_bl.bin
```
* 重新启动主板。
* 您现在可以使用自己喜欢的工具上传ArduPilot固件
您现在可以重新启动开发板并[连接您喜欢的地面站](https://ardupilot.org/copter/docs/common-connect-mission-planner-autopilot.html#common-connect-mission-planner-autopilot)(任务规划器、QGC 等),并且将来也可以使用 Pixhawk 板的常规方法上传固件。
### 使用外部闪存将固件加载到主板上[¶](https://ardupilot.org/copter/docs/common-loading-firmware-onto-chibios-only-boards.html#loading-firmware-onto-boards-with-external-flash)
最近的一些主板,最着名的是来自Serious Pro Racing()的主板,使用具有少量内部闪存但具有更大外部连接的闪存芯片的MCU。这些板需要额外的步骤来加载ArduPilot固件。通常,某种引导加载程序驻留在内部闪存上,然后主固件驻留在外部闪存上。
#### 使用 SSBL 加载固件[¶](https://ardupilot.org/copter/docs/common-loading-firmware-onto-chibios-only-boards.html#loading-firmware-using-ssbl)
SPRacing 系列主板在内部闪存上预装了专有引导加载程序,需要使用第二级引导加载程序来加载更多固件。有几个选项可以使用这些板加载固件,但无论您选择哪个选项,您都需要首先使用 SSBL 加载 ArduPilot。请按照 中的“安装”说明进行操作,以便将SSBL加载到主板上。加载 SSBL 后,请按照 PX4 说明将 ArduPilot 加载到主板[上 https://github.com/spracing/ssbl#px4-installation-to-external-flash](https://github.com/spracing/ssbl#px4-installation-to-external-flash) 但请不要使用 PX4 固件,请使用 arducopter.bin 固件映像。步骤摘要如下:
* 下载 并将SSBL安装到外部闪存,
* 下载最新的ArduPilot外部闪存二进制文件,例如
* 使用 dd 将二进制文件填充到 2MB:
```
dd if=/dev/zero ibs=1k count=2048 of=AP_2MB.bin
dd conv=notrunc if=arducopter.bin of=AP_2MB.bin
```
* 将主板置于 SSBL dfu 模式 - 关闭电源,按住 BIND (非启动),打开电源 - LED 快速闪烁,释放绑定,LED 缓慢闪烁 - DFU 模式已启用
* 使用
```
dfu-util -D AP_2MB.bin -s 0x90100000:0x200000
```
* 验证闪光灯。下面的dfu-util命令将闪存的内容复制回计算机,diff命令会告诉您内容是相同还是不同。如果 diff 没有说文件相同,请不要尝试飞行 - 重试。
```
dfu-util -U AP_2MB-VERIFY.bin -s 0x90100000:0x200000
diff -sb AP_2MB.bin AP_2MB-VERIFY.bin
```
* 关闭电源,安装 SD 卡(.注意:*您必须*安装 SD 卡,没有它固件将无法启动),打开电源
* 使用任务规划器正常配置电路板
此时,您应该在板上具有工作固件。如果要加载新固件,则需要再次执行步骤 2-7(无法使用任务规划器加载固件)。如果您确定永远不想在板上加载betaflight,那么您可以安装ArduPilot引导加载程序。
#### 安装 ArduPilot 引导加载程序[¶](https://ardupilot.org/copter/docs/common-loading-firmware-onto-chibios-only-boards.html#installing-the-ardupilot-bootloader)
警告
安装 ArduPilot 引导加载程序是单向操作。在此步骤之后,您无法将主板恢复为出厂配置或加载 beta - 假设可以,您必须将主板返回到 Serious Pro 才能使用出厂固件重新刷新
**如果您确定只想在开发板上使用 ArduPilot,那么**刷新 ardupilot 引导加载程序可以实现更简单的后续升级。
* 您最初必须在主板上安装ArduPilot的工作版本 - 请按照上述步骤操作。
* 现在,您必须移除内部闪存上的复制保护。这是一项破坏性操作,需要完全擦除闪光灯。ArduPilot提供支持,使这变得容易。设置 [BRD\_OPTIONS](https://ardupilot.org/copter/docs/parameters.html#brd-options) = 16。
* 关闭电源并打开主板电源。主板似乎无法启动,但闪存扇区正在擦除。等待几秒钟,然后关闭开发板电源。
* 按住按钮(这次*不*绑定启动)并打开自动驾驶仪的电源。这将使电路板处于 dfu 模式。`boot`
* 下载 ArduPilot 引导加载程序,例如
* 通过 dfu 安装引导加载程序:
```
dfu-util -a 0 --dfuse-address 0x08000000 -D SPRacingH7_bl.bin
```
* 重新启动主板。
* 您现在可以使用自己喜欢的工具上传ArduPilot固件